Most hosting companies supports PHP mail() function since it’s one of the standard way to send mail. If your hosting provider set it up correctly, it’s very stable and secure,but some companies do not support PHP mail() for their security reasons. In that case there is another option for you to send mail from your website via SMTP (Simple Mail Transfer Protocol). I will show you how to Configure WordPress to use SMTP in this article.
PHP mail is alright for regular WordPress website, but there are some limitations when you use PHP mail. PHP mail depends on PHP.ini settings to send email through sendmail. PHP mail does not support SMTP authentication which many mail server is required. That is why most of the time if you use PHP mail, your emails will end up in spam/junk folders. Unlike PHP mail, SMTP requires valid authentication to send emails, the headers match the rDNS record perfectly for sending email without being marked as spam or junk.
Another benefit using SMTP over PHP mail is you can hide your real web server if you are under cloudflare. Many people use cloudflare for CDN (content delivery network) purpose, and some people use cloudflare to protect their network or website. You can always hide your real web server IP with cloudflare to prevent DDOS or other type of attack to your web server, but there are several ways to get your real web server IP even you are under cloudflare’s protection. Sending email through PHP mail or sendmail is one way to give out our real web server IP since your mail server is the same as your web server. When you send out an email directly from your mail/web server, the email header will contain the mail server information such as hostname and IP address.
Sign up Mandrill Account
For this article, I’m going to use Mandrill SMTP server by MailChimp. With Mandrill you can send up to 12k or 12000 emails per month for FREE. If you need to send more than 12k emails per month, you can check out their pricing which is in my opinion very reasonable. Another great SMTP server which you can try is mailgun. Mailgun will let you send up to 10k or 10000 emails every month. Of couse you can always use gmail, yahoo, or hotmail/live SMTP server if you want to.
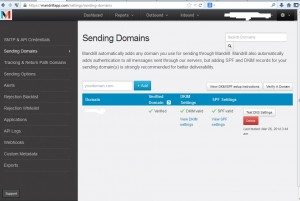
Go to Mandrill and sign up a free account for yourself. After you get your Mandrill account, login to your Mandrill settings page, then “Sending Domains”.

Setup Mandrill DKIM/SPF
Add the domain that you want to send mail from, it’s should be your wordpress website main domain. After you add your domain, click on “View DMIM/SPF setup instructions” to authorize Mandrill to send mail on your behalf from your domain. What you have to do simple add TXT record to your domain DNS server. Follow Mandrill instructions to add DKIM/SPF to your domain DNS server.
Verify your Domain
Next step is to verify your domain ownership with Mandrill account to prevent other Mandrill account from sending email from your domain. Click on “Verify A Domain” next to “View DMIM/SPF setup instructions”. Enter your email with your domain at the end, for example [email protected] . Mandrill will send an email to you with a link to verify, login to your email and click on that link. Simple as that.
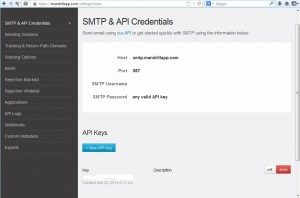
At this point you should have your domain verified with DKIM valid and SPF valid. Now at Mandrill settings page, go to “SMTP & API Credentials”.

You should have your Mandrill smtp server, Port number, username and password (password is an API key). If you don’t have API key, simply kick on “New API Key). Now you are good with Mandrill.
Install WordPress SMTP Plugins
To send email via SMTP for WordPress, you need to install SMTP plugins for WordPress. I’m going to use WP Mail SMTP for our article. There are some good SMTP plugins for wordpress like Easy SMTP Mail, WP SMTP, WP Mail SMTP, you can get a full list by going to your WordPress Admin Page, Plugins, Add New. Search for SMTP, pick the one which support your current/newest WordPress version. They all should have very similar interface to work with.
After install SMTP plugins for WordPress, go to that SMTP plugin setting page. You should see something like
- From Email: [email protected]
- From Name: your name
- SMTP Host:
- SMTP Secure
- SMTP Port
- SMTP Authentication
- Username
- Password
Fill those our with the information you got from Mandrill SMTP & API Credentials page. After done, save changes. You should be able to send mail from your wordpress website via Mandrill SMTP server by now. Every email send out from your domain will show Mandrill hostname and IP instead of your domain IP.
