
We use SSH or Secure Shell to make connection between computers to execute commands. Username and password authentication is normally used to establish connection. With a good strong password, it’s secure enough to use SSH since everything is encrypted through SSH. In this article I’m going to show you how to SSH login without password by using private/public key-based authentication system. Key-based authentication is more convenient and secure than tradition password authentication since both private/public key is encrypted with asymmetric cryptography.
Secure Shell keys are made of two keys: a private key, that must be kept secret, and a public key which can be uploaded to any computer you need to access a ssh server. Note: Keys can be used with a password (passphrase to be correct) or without one.
Generate Keys
SSH supports both RSA and DSA, there are differences between DSA and RSA, but for our purpose to encrypt and decrypt data for SSH (Secure Shell), it’s up to use what to choose. By default if you don’t defined which algorithm, ssh-keygen will create RSA. Your ssh private/public keys will be generated and saved to your home ~/.ssh directory.
Creating RSA Secure Shell Keys
RSA (Rivest-ShamirAdleman) algorithm is a cryptosystem, owned by RSA Security which similar to DSA is widely used to transmit date securely over networks or the Internet. The greatest benefit of using RSA is RSA uses asymmetric keys. Meaning that if you send an encrypted message, everyone can encrypt data for you to read by using public key, but only you have a private key (only you have it) which is required to decrypt the data.
$ ssh-keygen -t rsa
By default, *ssh-keygen* or *ssh-keygen -t rsa* will create a 2048 bit RSA key pair. For maximum security (over kill for our purpose), if you want you can increase the key to 4096 bit for RSA.
$ ssh-keygen -t rsa -b 4096
Output for ssh-keygen -t rsa:
Generating public/private rsa key pair.
Enter file in which to save the key (/home/user/.ssh/id_rsa):
Enter passphrase (empty for no passphrase):
Enter same passphrase again:
Your identification has been saved in /home/user/.ssh/id_rsa.
Your public key has been saved in /home/user/.ssh/id_rsa.pub.
The key fingerprint is:
06:d6:75:38:d0:34:59:a8:33:10:06:ef:dd:9f:69:b8 user@localhost
The key's randomart image is:
+--[ RSA 2048]----+
|    ..o..++=o    |
|     o.. .*o     |
|      +... .     |
|     o o+.       |
|      . So.      |
|       .   o o   |
|          . =    |
|           o     |
|          E      |
+-----------------+
Creating DSA Secure Shell Keys
Similar to RSA, DSA is another algorithm which is developed by NSA or US. National Security Agency. DSA must meet US. government’s standard for digital signatures which is safe for SSH usage. DSA or Digital Signature Algorithm is based on discrete logarithm, which is a one way math problem. Means it’s easy to create one way math equation, but you can’t solve that equation another way around.
$ ssh-keygen -t dsa
Output for ssh-keygen -t dsa:
Generating public/private dsa key pair.
Enter file in which to save the key (/home/user/.ssh/id_dsa):
Enter passphrase (empty for no passphrase):
Enter same passphrase again:
Your identification has been saved in /home/user/.ssh/id_dsa.
Your public key has been saved in /home/user/.ssh/id_dsa.pub.
The key fingerprint is:
ec:b9:b2:ca:80:62:a2:8c:9c:b3:34:c9:d5:2a:76:30 user@localhost
The key's randomart image is:
+--[ DSA 1024]----+
|                 |
|                 |
|                 |
|    .  .         |
| E . .  S        |
|..= .  . .       |
|+O.o    o        |
|@.=o  .  .       |
|o=o o..o.        |
+-----------------+
Key files permissions
Typical directories and files permission in Linux
Normal directories permission: 755 or (rwx r-x r-x)
- Owner has Read, Write and Execute
- Group has Read and Execute only
- Other has Read and Execute only
Normal files permission: 644 or (rw- r– r–)
- Owner has Read and Write
- Group has Read only
- Other has Read only
SSH private and public keys need stricter directories and files permission. Generally ssh private keys will be stored in user’s .ssh directory or ~/.ssh/. You will want 700 for ~/.ssh/ directory and 600 for private key, and 644 public key. You don’t need change public key permission since it has default linux file permission.
~/.ssh/ directory permission: 700 or (rwx — —)
- Owner has Read, Write and Execute
- Group has no rights
- Other has no rights
Private key files permission: 600 or (rw- — —)
- Owner has Read and Write
- Group has no rights
- Other has no rights
To change ~/.ssh/ directory and private keys permission
$ chmod 700 ~/.ssh/
$ chmod g-w ~/
For DSA private key
$ chmod 600 ~/.ssh/id_dsa
For RSA private key
$ chmod 600 ~/.ssh/id_rsa
You might get error like this if you have not set your ~/.ssh/ directory and private/public key correctly.
Authentication refused: bad ownership or modes for directory /home/user
or
@@@@@@@@@@@@@@@@@@@@@@@@@@@@@@@@@@@@@@@@@@@@@@@@@@@@@@@@@@@
@         WARNING: UNPROTECTED PRIVATE KEY FILE!          @
@@@@@@@@@@@@@@@@@@@@@@@@@@@@@@@@@@@@@@@@@@@@@@@@@@@@@@@@@@@
Permissions 0644 for '/home/user/.ssh/id_dsa' are too open.
It is required that your private key files are NOT accessible by others.
This private key will be ignored.
bad permissions: ignore key: /home/user/.ssh/id_dsa
Copy public key to the SSH server
Now you should have your SSH public and private keys. You will need to copy your public key to the remote ssh server which you want to login without a password 🙂 There are two ways to do it, the hard way (manual copy) or the easy way by using ssh-copy-id command. I will show you how both ways in this article.
Manual way or Geek way
Depends on what key type you generated DSA or RSA, the ssh public key should look like id_dsa.pub or id_rsa.pub. Basically you need to copy the content of the public key on your local machine to the remote ssh server.
Copy the public key content in your local machine
Change directory to /.ssh/ directory
$ cd ~/.ssh/
View DSA public key
$ cat id_dsa.pub
View RSA public key
$ cat id_rsa.pub
Sample ssh RSA public key
ssh-rsa AAAAB3NzaC1yc2EAAAADAQABAAABAQDMmxymfUF8WCvJf87eQo3TFUxX9lqNrErrPdcZauK8+IJ3vAZxQ6UwlzifHUoFN8d0s0x32ILuuI94PTc+5PyrImDalRtBYpFDbFxggxcAxfy2Bd36jFpSon2YWOLBkT9Keb/8ggSJRPffgCUUqCJCB9P6nUDXMbDBVZ0yIX3oJKqRsLKCglR4LL//h8lY4jmOduMjHoi5x8KDSL6m6Uz7IzSKPdGiIZLbe5T4gxbxtq8GfcjYz6Gj/98yIln5GPMSB9jEZy2RNoip9grd/RYKu/dMTZTJPNTiHqUnRolOvS7d5QK7SA9H0a+a0bv0igBnpguyR1Ks7cSL04E7AfQn user@localhost
You should be able to view the ssh public key, copy full content of the file to a text editor for temporary.
Next, login to the remote ssh server with your username and password, yes the old way 🙂
$ ssh -p 22 user@remotesshhost
You wil need to create authorized_keys in ~/.ssh/ directory on the remote ssh server. In the remote ssh server
$ cd ~/.ssh/
$ nano authorized_keys
Copy and save the content of the ssh public key from your local machine which I told you to copy it to text editor to authorized_keys file on remote ssh remote server.
Ease way or lazy way
I’m going to reveal the secret Linux Command which help you to copies localhost ssh public key and install to the remote machine’s authorized_keys file. Please don’t tell this secret to anyone or the world will be doomed. In your local machine, type in:
$ ssh-copy-id -i user@remote-host
You will be asked to type your password of the user at the remote-host once to copy/import id_rsa.pub file from your localhost to remote-host. It’s fast and easy, isn’t it?
There is also another secret Linux Command to perform same function as ssh-copy-id if you want to know
For RSA ssh public key
cat ~/.ssh/id_rsa.pub | ssh user@remote-host 'cat >> .ssh/authorized_keys'
For DSA ssh public key
cat ~/.ssh/id_dsa.pub | ssh user@remote-host 'cat >> .ssh/authorized_keys'
Configure SSH server to accept key authentication
We have everything almost ready to go, the last but not least is to configure ssh server to accept private/public key authentication.
Open sshd_config file
$ sudo -
# nano /etc/ssh/sshd_config
Search for
RSAAuthentication yes
PubkeyAuthentication yes
AuthorizedKeysFile      .ssh/authorized_keys
Make sure that two lines are not commented( hash # sign in-front of the line), if you see # or hash sign in-front of that two line, remove the # or hash sign, and *yes* answer after RSAAuthentication and PubkeyAuthentication. Save and restart your ssh server.
# service sshd restart
or
# /etc/init.d/ssh restart
Login to SSH server without password
Everything is set to go, you should be able to login to your remote ssh server without password (if you didn’t set passphrase when you generate ssh keys).
$ ssh user@remotesshhost
$ ssh -i ~/.ssh/id_rsa user@remotesshhost
or if you copied/saved your private key to different location, you can use
$ ssh -i /home/user/whateverdirectory/id_rsa user@remotesshhost
$ ssh -i /home/user/whateverdirectory/id_dsa user@remotesshhost
Convert ssh key to putty ppk private key
By any chance if you need to use putty on a windows machine to login your remote ssh server, you have to convert your private ssh key generated in linux to putty private key ppk format. On your windows machine, download PuTTY Key Generator, it’s called PuTTYgen: puttygen.exe
After downloading PuTTY Key Generator, run puttygen.exe file. To convert linux private ssh key to putty ppk private key, go to Conversions, it’s on the top bar. Then choose *Import key*, locate your linux ssh private key. You will something like the picture below.
In *Parameters* section, depends on what type of your private key, dsa or rsa, choose SSH-2 RSA or SSH-2 DSA accordingly. After PuTTY Key Generator imported/loaded your linux ssh private key, choose *Save private key*
(I used passphrase for my keys, if you didn’t use passphrase, you should not see *****)
SSH login without password using PuTTY
Putty is a free telnet/ssh client, you can use PuTTY to login with password or with private/public ssh key. After you you converted your id_rsa or id_dsa private key to putty ppk format, you can use that .ppk file to login to your remote ssh server without typing password.
First, start your putty.exe, you can se Host name (or IP adress) and Port text box. Type in your SSH server host name or address, and your ssh server port.

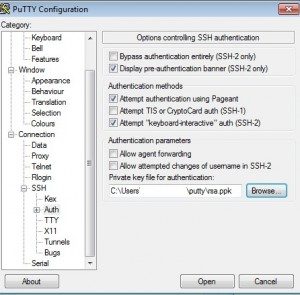
Next, on the left hand size, you should see Category, under *Connection*, go to *SSH*, then *Auth*. Click on *Browse* to locate your putty ppk private key. After that click on *open* to start your ssh session. You will be asked for your ssh username, if you have your public/private ssh key set up correctly, you won’t be asked for password.
—————————————————————-
Note:
1. If you see
Agent admitted failure to sign using the key.
Permission denied (publickey).
It means ssh-agent does not recognize the newly generated ssh key yet. Logout and login your current ssh session, or use this command
$ ssh-add
2. To add another layer of protection with your public/private key, use passphrase. You still need your private key to login but with a passphrase (password).
3. you can copy your private key (id_dsa or id_rsa) to your usb flash drive, and use your private key to login to your remote ssh server anywhere you go.
4. You can also generate public / private ssh key by using PuTTY Key Generator, I will show you how in another article.
5. I found some great videos about DSA and RSA algorithm if you really want to understand more about them.
The discrete logarithm problem (DSA)
RSA Encryption step 1
RSA Encryption step 2
RSA Encryption step 3