How to install VNC Server on Ubuntu 15.10
I have written several tutorials how to install VNC Server on Ubuntu but they are quite outdated. As of right now the current newest version of Ubuntu is 15.10 Wily Werewolf, I’m going to show you how to install VNC Server on Ubuntu 15.10 in this tutorial. I’m using fresh install Ubuntu 15.10 64-bit server version, as Ubuntu server does not come with a GUI (graphical user interface) I will have to install one. If you have a Ubuntu Desktop version, you may skip the installing GUI step on this tutorial.
Update Ubuntu 15.10
As usual I always update my system before I install anything. It’s a good practice to keep our servers/machines secured also.
$ su -

# apt-get update && apt-get dist-upgrade -y
Install GUI on Ubuntu 15.10 Server
As I stated before If you Ubuntu 15.10 Desktop version, you can skip this step since Desktop version already have a GUI installed. I’m using Ubuntu 15.10 64-bit Server for this tutorial so I will install a GUI of my choice, XFCE is always my favorite Desktop Environment. You can install other but for the shake of this tutorial I will just use XFCE.
# apt-get install xubuntu-desktop xfce4 firefox nano -y
This step may take sometime (depends on your Internet speed and your machine power/speed) so grab a cup of tea of coffee and enjoy it after you run the command above.
Install VNC Server on Ubuntu 15.10
Installing VNC Server on Ubuntu 15.10 is simple, but configuration is another story.
# apt-get install vnc4server -y
Configure VNC Server to work on Ubuntu 15.10
Now it’s the important part of the whole tutorial to make VNC Server work well on Ubuntu 15.10. Please read and follow the steps below carefully.
Adding privileged user
You can always run your system with root, but it’s not a good security practice. If you have a regular/privileged user, you can skip this step. If you are using root, I strongly recommend you to create a regular/privileged user and use this user rather than root. For the purpose of this tutorial, I’m creating “vncuser” user, but you can choose whatever user/username you want to use or even your exiting privileged user.
# adduser vncuser
root@namhuy:~# adduser vncuser
Adding user `vncuser' ...
Adding new group `vncuser' (1001) ...
Adding new user `vncuser' (1001) with group `vncuser' ...
Creating home directory `/home/vncuser' ...
Copying files from `/etc/skel' ...
Enter new UNIX password:
Retype new UNIX password:
passwd: password updated successfully
Changing the user information for vncuser
Enter the new value, or press ENTER for the default
Full Name []:
Room Number []:
Work Phone []:
Home Phone []:
Other []:
Is the information correct? [Y/n]
Setting up Vnc Server on Ubuntu 15.10
If you already have your privileged user, it’s time to switch to the user that you want to login to VNC Server. We are going to modify xstartup file to start xfce4 session whenever VNC server is started.
# su - vncuser
Start VNC server with that user for VNC server to create some necessary files first time.
$ vncserver
First time you startup vncserver, you will be asked to provide vnc’s password to access to your VNC Server. This password can be the same as your user’s password or different, it’s up to you but I highly recommend you to set this password different to your user’s password for better security measure.
You will require a password to access your desktops.

Password:
Verify:
xauth: file /home/vncuser/.Xauthority does not exist

New 'namhuy:1 (vncuser)' desktop is namhuy:1

Creating default startup script /home/vncuser/.vnc/xstartup
Starting applications specified in /home/vncuser/.vnc/xstartup
Log file is /home/vncuser/.vnc/namhuy:1.log
vncserver will created a few files (log, pid, passwd, and xstartup) in your user’s home directory.
The next step is to turn off vncserver to modify the xstartup file (startup script) to make vncserver start with xfce4 (we installed xfce4 for this tutorial)
$ vncserver -kill :1
After turning off vncserver, we now can modify xstartup file in your user’s home directory
$ nano .vnc/xstartup
#!/bin/sh

# Uncomment the following two lines for normal desktop:
# unset SESSION_MANAGER
# exec /etc/X11/xinit/xinitrc

[ -x /etc/vnc/xstartup ] && exec /etc/vnc/xstartup
[ -r $HOME/.Xresources ] && xrdb $HOME/.Xresources
xsetroot -solid grey
vncconfig -iconic &
x-terminal-emulator -geometry 80x24+10+10 -ls -title "$VNCDESKTOP Desktop" &
x-window-manager &
#!/bin/sh

# Uncomment the following two lines for normal desktop:
unset SESSION_MANAGER
exec /etc/X11/xinit/xinitrc

startxfce4 &

[ -x /etc/vnc/xstartup ] && exec /etc/vnc/xstartup
[ -r $HOME/.Xresources ] && xrdb $HOME/.Xresources
xsetroot -solid grey
vncconfig -iconic &
x-terminal-emulator -geometry 80x24+10+10 -ls -title "$VNCDESKTOP Desktop" &
x-window-manager &
Save xstartup when you are done.
Create VNC Server statup script
vncserver won’t auto start on boot unless you create a startup script for it, here is the startup script to start vncserver on boot. All you have to do is to create /etc/init.d/vncserver file as root
# nano /etc/init.d/vncserver
#!/bin/bash
### BEGIN INIT INFO
# Provides:          tightvncserver
# Required-Start:    $syslog
# Required-Stop:     $syslog
# Default-Start:     2 3 4 5
# Default-Stop:      0 1 6
# Short-Description: vnc server
# Description: https://www.itbeginer.net
#
### END INIT INFO

unset VNCSERVERARGS
VNCSERVERS=""
[ -f /etc/vncserver/vncservers.conf ] && . /etc/vncserver/vncservers.conf
prog=$"VNC server"
start() {
. /lib/lsb/init-functions
REQ_USER=$2
echo -n $"Starting $prog: "
ulimit -S -c 0 >/dev/null 2>&1
RETVAL=0
for display in ${VNCSERVERS}
do
export USER="${display##*:}"
if test -z "${REQ_USER}" -o "${REQ_USER}" == ${USER} ; then
echo -n "${display} "
unset BASH_ENV ENV
DISP="${display%%:*}"
export VNCUSERARGS="${VNCSERVERARGS[${DISP}]}"
su ${USER} -c "cd ~${USER} && [ -f .vnc/passwd ] && vncserver :${DISP} ${VNCUSERARGS}"
fi
done
}
stop() {
. /lib/lsb/init-functions
REQ_USER=$2
echo -n $"Shutting down VNCServer: "
for display in ${VNCSERVERS}
do
export USER="${display##*:}"
if test -z "${REQ_USER}" -o "${REQ_USER}" == ${USER} ; then
echo -n "${display} "
unset BASH_ENV ENV
export USER="${display##*:}"
su ${USER} -c "vncserver -kill :${display%%:*}" >/dev/null 2>&1
fi
done
echo -e "\n"
echo "VNCServer Stopped"
}
case "$1" in
start)
start $@
;;
stop)
stop $@
;;
restart|reload)
stop $@
sleep 3
start $@
;;
condrestart)
if [ -f /var/lock/subsys/vncserver ]; then
stop $@
sleep 3
start $@
fi
;;
status)
status Xvnc
;;
*)
echo $"Usage: $0 {start|stop|restart|condrestart|status}"
exit 1
esac
# chmod +x /etc/init.d/vncserver
Create VNC Server configuration file
We are going to create vncservers.conf file in /etc/vncserver directory to set VNC’s port, screen resolution for each user.
# mkdir -p /etc/vncserver
# nano /etc/vncserver/vncservers.conf
Copy the content below to vncservers.conf file
# VNC port:user
# 1 for port 1 and 5901, 2 for port 2 and 5902, 3 for port 3 and 5903, and so on
VNCSERVERS="1:vncuser"

# VNC screen resolution
#GEOMETRY="<WIDTH>x<HEIGHT>"
VNCSERVERARGS[1]="-geometry 1024x768"

# Color depth (choose 8, 16, or 32)
DEPTH="32"
The first line is for VNC ports and VNC users. number “1” is the VNC port, it’s port “1” or “5901”, you can add or change the port to “2” or “5902” and so on. If you want more users to connect to your VNC Server, you must include those users here. Save the file when you are done with it.
The final step is to make VNC Server starts on boot
# update-rc.d vncserver defaults 99
Reboot your Ubutnu 15.10 system and test out your new VNC Server on Ubuntu 15.10
# reboot
Using VNC Server on Ubuntu 15.10
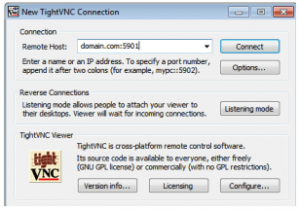
You can login to your VNC Server with IP address or hostname/domain name by using RealVCN viewer or TightVNC viewer. You will be asked for your user VNC’s password.
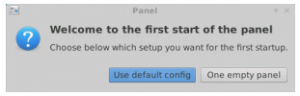
When your VNC session starts the first time, Xfce4’s panel will ask you to choose “Use default config” or “One empty panel”. Choose/click on “Use default config”
Wella you now have a working VNC Server on Ubuntu 15.10