
Visual Topology
Command Lis
| Command | Description |
|---|---|
| ? or help | Lists available commands in your current mode |
| Clock set | Sets the system clock |
| Configure Terminal | Enters global configuration mode |
| Copy run start | Saves your dynamic running config to NVRAM |
| Delete name | Deletes a file |
| Do command | Allows for the execution of commands located in a different mode |
| Enable | Enters privileged EXEC mode from user EXEC mode |
| End | Terminates configuration mode |
| Erase startup-config | Erases the startup-configuration from NVRAM |
| Exit | Exits current configuration mode |
| Terminal history size number | Sets the number of lines held in the history buffer. |
| Hostname name | Sets a system name and is displayed within the system prompt |
| Interface Vlan 1 | Enters the interface configuration (SVI) for Vlan 1 and allows you to set the management IP address for the switch. |
| IP address address & mask | Set an IP address and also the network/subnet mask |
| Line console 0 | Enters line console configuration mode |
| Logging synchronous | Prevents unsolicited messages from interfering when typing in your commands |
| Reload | Restarts the device |
| Show clock | Displays the system clock |
| Show flash: | Displays the contents of the flash memory |
| Show startup-config | Displays the startup-config saved in NVRam |
| Show terminal | Displays the current settings for the terminal |
| Show version | Displays hardware and software information |
Physical Topology Diagram
- Task 1: Reload and check that the Switch is set to factory defaults.
- Task 2: Defining a hostname and enabling a management IP address.
- Task 3: Using context-sensitive help.
- Task 4: Changing default CLI parameters.
Lab 1-1: Switch Startup and Initial Configuration.
Task 1: Reload and check that the Switch is set to factory defaults.
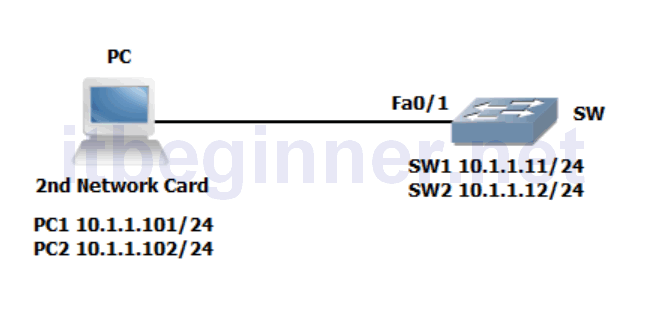
Step 1: Assign an IP address to your PC using the details listed in the visual topology diagram. The PC should be fitted with two network adapters check with the instructor if you are unsure which network adapter should be configured.
Step 2: Access the Switch Console port using the method and information provided by the instructor.
At the Switch> prompt (if you see any other prompt or are asked for a password contact the instructor), enter the erase startup-config command and make a note of the result.
Why did this fail?
Step 3: From the user prompt type in the command which enters privilege exec-mode.
Does the system prompt change and if so, how?
Now try and execute the Erase startup-config command, once again make a note of the output.
Do you see a different console message?
Step 4: Switches hold information about logical VLANs in a database stored in their flash memory and it is necessary to delete this database to reset the Switch back to factory defaults. PLEASE BE VERY CAREFUL WHEN USING THE DELETE COMMAND.
From Privilege mode type in the following command and follow the system messages (if you are unsure what to do, contact the instructor before answering any of the system messages).
Switch#Delete flash:vlan.dat
Step 5: Use the appropriate command to verify that the Switch doesn’t have a current startup-configuration and use the appropriate show command to display information about the device hardware and software parameters.
Step 6: Reload the Switch.
Please note the Switch may take a few minutes to reload.
Task 2: Defining a hostname and enabling a management IP address.
Step 1: Change the hostname of the Switch to either SW1 or SW2
Step 2: Assign your Switch a management IP address from the values identified in the visual topology diagram at the beginning of the lab exercise.
Step 3: Verify connectivity between your PC and the Switch using the Ping command, remember that your PC might have a personal firewall installed which could prevent the Switch from Pinging the PC.
Was the Ping successful ?
If not, investigate and correct the problem.
Task 3: Using context-sensitive help.
Step 1: Access the privilege mode on your Switch and enter ? to list the available commands.
Step 2: Using the ? navigate through the series of command options to set the system time to the current time and date. Note that the system will support abbreviated commands provided they are unique and using the Tab key will automatically complete the command.
Step 3: Use a command to show the current time and date.
Step 4: Type in the following command at the privilege command prompt.
! The next set of commands will configure the links to the core office
The ! at the beginning of a line indicates that you are entering a comment into the running configuration, this can be very useful to other colleagues and engineers who are trying to ascertain the nature of the configuration.
Step 5: To help navigate around the CLI (command line interface) a number of key combinations can be used. Spend a few minutes trying these combinations out and make a note of what they appear to do, for the best result execute a few valid show commands first.
Ctrl P or the up arrow key
Ctrl A
Backspace
Task 4: Changing default CLI parameters.
Step 1: Using the show terminal command, verify that history is enabled and determine the current history size for the console Iine.
Step 2: Use the appropriate command to change the history size to a value of 100 for the console line.
Step 3: When you mistype a command, the system will try and translate it into an IP address which can take some time and be very annoying, however by issuing the no IP domain-lookup command it disables the translation look-up.
At the command prompt enter a mistyped command and monitor how long it takes for the system to return an error message, now execute the no IP domain-lookup command and try the mistyped command for a second time and notice the difference.
Step 4: When accessing the console port there is a default keyboard inactivity timeout of 10 minutes. Change this timer to 60 minutes.
Step 5: What does the logging synchronous command do?
Enable this command on the line console 0 port.
Step 6: Save your running-configuration.
Lab Answer Keys:
[sociallocker id=”4139″]
Task 1: Reload and check that the Switch is set to factory defaults.
Step 2: Access the Switch Console port using the method and information provided by the instructor.
At the Switch> prompt (if you see any other prompt or are asked for a password contact the
instructor), enter the erase startup-config command and make a note of the result.
Switch>erase startup-config
^
% Invalid input detected at '^' marker.
Why did this fail?
The erase startup-config command is not supported in user mode.
Step 3: From the user prompt type in the command which enters privilege exec-mode.
Switch>enable
Switch#
Does the system prompt change and if so, how?
Displays hostname> in user mode
Displays hostname# in privilege mode (sometimes called enable mode)
Now try and execute the Erase startup-config command, once again make a note of the output.
Do you see a different console message?
YES
Switch#erase startup-config
Erasing the nvram filesystem will remove all configuration files! Continue? [confirm]
Step 5: Use the appropriate command to verify that the Switch doesn’t have a current startup-configuration and use the appropriate show command to display information about the device hardware and software parameters.
Switch#sh startup
startup-config is not present
Switch#sh version
Step 6: Reload the Switch.
Switch#reload
Proceed with reload? [confirm]
Task 2: Defining a hostname and enabling a management IP address.
Step 1: Change the hostname of the Switch to either SW1 or SW2
Switch>enable
Switch#conf t
Switch(config)#hostname SW1
Step 2: Assign your Switch a management IP address from the values identified in the visual topology diagram at the beginning of the lab exercise.
SW1>enable
SW1#conf t
SW1(config)#interface vlan 1
SW1(config-if)#ip address 10.1.1.11 255.255.255.0
or
SW2(config-if)#ip address 10.1.1.12 255.255.255.0
Step 3: Verify connectivity between your PC and the Switch using the Ping command, remember that your PC might have a personal firewall installed which could prevent the Switch from Pinging the PC.
Was the Ping successful ?
YES
If not, investigate and correct the problem.
Task 3: Using context-sensitive help.
Step 1: Access the privilege mode on your Switch and enter ? to list the available commands.
PLEASE NOTE FOR ILLUSRATION PURPOSES THAT THE PROMPT FOR THE REST OF THE DOCUMENT WILL BE SHOWN AS SW or R, THIS WILL DIFFER FROM YOUR OUTPUT.
SW#?
Exec commands:
<1-99>   Session number to resume
clear   Reset functions
clock   Manage the system clock
configure   Enter configuration mode
connect   Open a terminal connection
copy   Copy from one file to another
debug   Debugging functions (see also 'undebug')
delete   Delete a file
dir   List files on a filesystem
disable   Turn off privileged commands
disconnect   Disconnect an existing network connection
enable   Turn on privileged commands
erase   Erase a filesystem
exit   Exit from the EXEC
logout   Exit from the EXEC
more   Display the contents of a file
no   Disable debugging informations
ping   Send echo messages
reload   Halt and perform a cold restart
resume   Resume an active network connection
setup   Run the SETUP command facility
--More--
The above is an example output which may differ from the output you see.
Step 2: Using the ? navigate through the series of command options to set the system time to the current time and date. Note that the system will support abbreviated commands provided they are unique and using the Tab key will automatically complete the command.
SW#clock ?
 set Set the time and date
SW#clock set ?
 hh:mm:ss Current Time
SW#clock set 20:30:00 ?
 <1-31> Day of the month
 MONTH Month of the year
SW#clock set 20:30:00 13 aug ?
 <1993-2035> Year
SW#clock set 20:30:00 13 aug 2013
Step 3: Use a command to show the current time and date.
SW#show clock
Step 5: To help navigate around the CLI (command line interface) a number of key combinations can be used. Spend a few minutes trying these combinations out and make a note of what they appear to do, for the best result execute a few valid show commands first.
Ctrl P or the up arrow key Displays previous command entered
Ctrl A Moves the cursor to the front of the command line
Backspace Deletes the previous last character
Task 4: Changing default CLI parameters.
Step 1: Using the show terminal command, verify that history is enabled and determine the current history size for the console Iine.
History is enabled, history size is 10.
Step 2: Use the appropriate command to change the history size to a value of 100 for the console line.
SW#terminal history size 100
Step 4: When accessing the console port there is a default keyboard inactivity timeout of 10 minutes. Change this timer to 60 minutes.
SW#conf t
SW(config)#line con 0
SW(config-line)#exec-timeout 60
Step 5: What does the logging synchronous command do?
Prevents unsolicited messages merging with the commands you type in.
Step 6: Save your running-configuration.
SW#copy run start
[/sociallocker]