Lab 1-3: Configuring EtherChannel
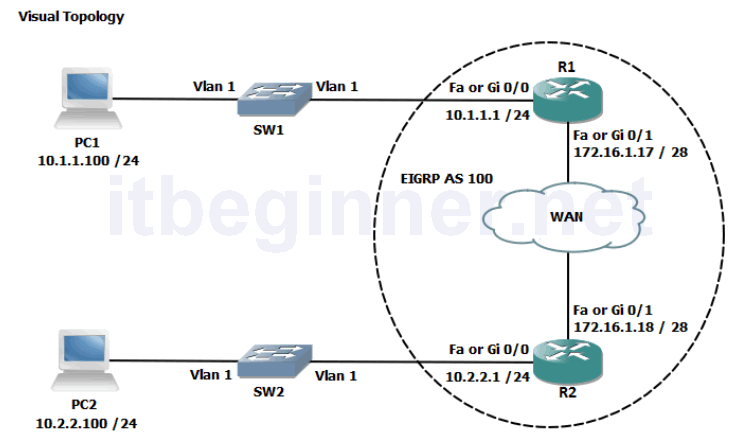
Physical Topology Diagram
- Visual Topology
- Command List
- Task 1: EtherChannel configuration
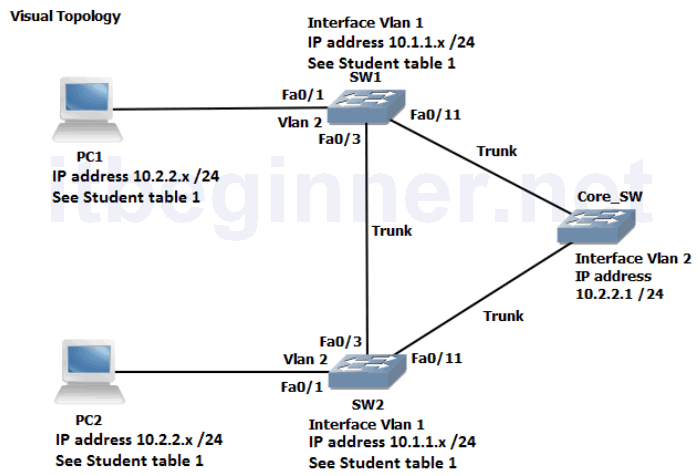
Visual Topology
Command List
| Command | Description |
|---|---|
| Channel-group id mode active | Configures an interface as EtherChannel bundle members using LACP in active mode. |
| Channel-group id mode passive | Configures an interface as EtherChannel bundle members using LACP in passive mode. |
| Configure Terminal | Enters global configuration mode. |
| Copy run start | Saves the dynamic running-config to NVRAM. |
| Interface range range | Enters interface range configuration mode |
| Show etherchannel port-channel | Displays port-channel interface information |
| Show Interface interface | Displays interface statistics |
| Show spanning-tree vlan id | Verifies spanning-tree information for a given VLAN |
PC readiness: Assign the IP addresses used in the visual topology diagram for this exercise.
Task 1: EtherChannel Configuration
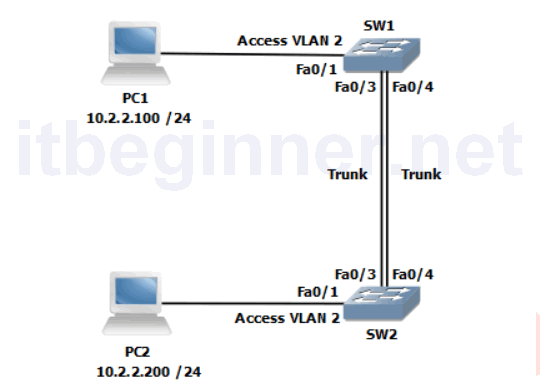
Step 1: Enable switchports fa0/1, fa0/3 and fa0/4 all other switchports should be shutdown.
Hint….Use the interface range command to speed up the process.
Step 2: Configure fa0/4 as a trunk connection.
Step 3: Validate that VLANs 1 and 2 are active on your switch
SW#sh vlan
Create vlan 2 if it doesn’t exist.
Step 4: Because of the parallel links (fa0/3 & fa0/4) between the 2 switches spanning-tree will block one of the ports to prevent a loop. Use an appropriate show command to verify this.
Step 5: Shutdown fa0/3 and fa0/4
Step 6:
SW1 only....
Configure fa0/3 and fa0/4 interfaces as part of an Etherchannel bundle. Use 1 as the port channel identifier and configure LACP in active mode.
SW2 only....
Configure fa0/3 and fa0/4 interfaces as part of an Etherchannel bundle. Use 1 as the port channel identifier and configure LACP in passive mode.
Step 7: Enable fa0/3 and fa0/4
Step 8:
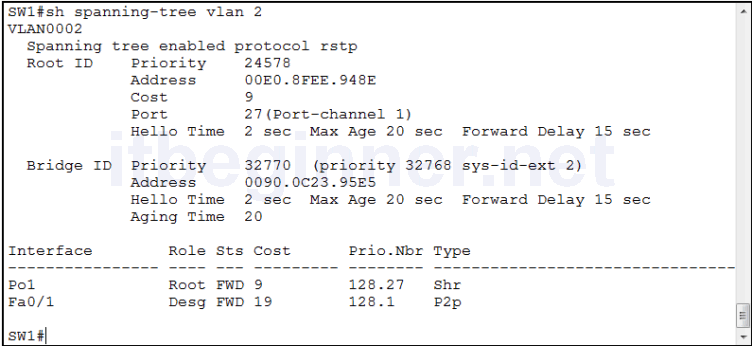
SW1 only....
Execute
SW1#show spanning-tree vlan 2
SW2 only
Execute
SW1#show spanning-tree vlan 1
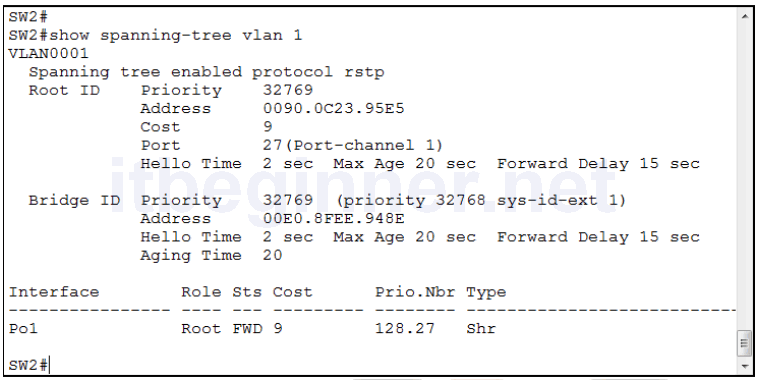
Notice the Root port is now shown as Po1, which is the logical port created by the EtherChannel bundle.
Step 9: Save your running-config
Lab Answer Keys:
[sociallocker id=”4139″]
Task 1: EtherChannel Configuration
Step 1: Enable switchports fa0/1, fa0/3 and fa0/4 all other switchports should be shutdown.
SW(config)#int range fa0/1, fa0/3 - 4
SW(config-if-range)#no shut
Step 2: Configure fa0/4 as a trunk connection.
SW(config)#int fa0/4
SW(config-if)#shut
SW(config-if)#switchport mode trunk
SW(config-if)#no shut
Step 4: Because of the parallel links (fa0/3 & fa0/4) between the 2 switches spanning-tree will block one of the ports to prevent a loop.
Use an appropriate show command to verify this.
SW#sh spanning-tree summary
Look for a blocked port on one of the switches.
Step 5: Shutdown fa0/3 and fa0/4
SW(config)#int range fa0/3 - 4
SW(config-if-range)#shut
Step 6:
SW1 only....
Configure fa0/3 and fa0/4 interfaces as part of an Etherchannel bundle. Use 1 as the port channel identifier and configure LACP in active mode.
SW1(config-if-range)#channel-group 1 mode active
SW1(config-if-range)#no shut
SW2 only....
Configure fa0/3 and fa0/4 interfaces as part of an Etherchannel bundle. Use 1 as the port channel identifier and configure LACP in passive mode.
SW2(config-if-range)#channel-group 1 mode passive
SW2(config-if-range)#no shut
Step 9: Save your running-config
SW#copy run start
[/sociallocker]