
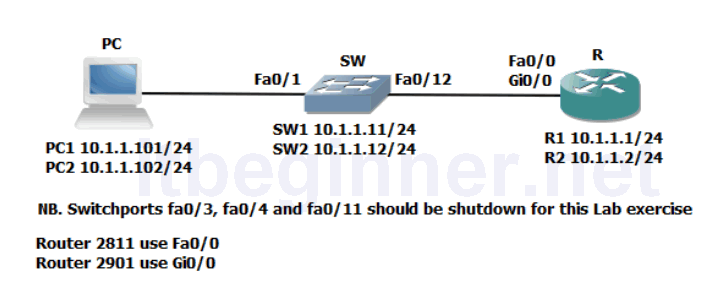
Visual Topology
Command Lis
| Command | Description |
|---|---|
| Configure Terminal | Enters global configuration mode. |
| Copy run start | Saves the dynamic running-config to NVRAM. |
| Description | Adds a descriptive comment to an interface |
| Erase startup-config | Removes the saved startup-config from NVRAM |
| Exec-timeout | |
| Hostname name | Sets the system device name |
| Interface type module/slot/port | Enters interface mode |
| IP address address/mask | Sets an IP address and network/subnet mask. |
| [no] IP domain lookup | Translates host/FQDN to IP addresses |
| Line con 0 | Enters the console configuration mode |
| Logging synchronous | Prevents unsolicited messages from interfering when typing in your commands |
| Ping ip address/host | Checks IP connectivity |
| Reload | Restarts the system |
| Show CDP | Displays CDP parameters |
| Show CDP neighbors [detail] | Displays the contents of the CDP dynamic table |
| Show interface | Displays interface parameters and status |
| Show version | Displays hardware and software information |
| [no] shutdown | Disables or enable an interface |
Physical Topology Diagram
- Task 1: Router hardware and software inspection.
- Task 2: Create the initial Router configuration.
- Task 3: Changing default CLI parameters.
- Task 4: Neighbour discovery using CDP.
Lab 2-1: Router startup and Initial Configuration
Task 1: Router hardware and software inspection.
Step 1: Access the CLI of your router and enter privilege exec mode.
Step 2: Use the appropriate command to display the hardware and software properties of the router.
Fill in the table below.
| Router Model | |
| System image file | |
| RAM | |
| Flash | |
| Software version |
Step 3: Check the NVRAM for a startup-config file using the sh start command and the startup-configuration if one exists using the erase startup-config command.
Step 4: Issue the reload command to restart the router and observe the boot process from the console.
Task 2: Create the initial Router configuration.
Step 1: Skip the initial configuration dialog, terminate the autoinstall and enter privilege EXEC mode.
Step 2: Set the system hostname to either R1 or R2
Does the system prompt change?
Step 3: Enter the correct configuration mode to add a description to the first ethernet interface on the router (fa0/0 or gi0/0) Link to LAN Switch.
Step 4: Configure an interface IP address and mask with reflects the values shown in the Visual Topology diagram.
R1 10.1.1.1/24
R2 10.1.1.2/24
What is the status of the interface?
Do you think we could ping the IP address of the switch?
Take any necessary steps to enable IP connectivity between the Router and the Switch before you move on to the next step.
Step 5: Save your running-config to NVRAM
Task 3: Changing default CLI parameters.
Step 1: Change the EXEC timeout on the console port to a value of 60 minutes
Step 2: Enter the sh line con 0 command
Does this command verify the new timeout value?
Step 3: Improve the readability of the console access by synchronising unso licited messages and debug outputs with the input of the CLI.
Step 4: Use the relevant command which prevents the system from translating a mistyped command to an IP address.
Step 5: Save your running-config to NVRAM
Task 4: Neighbour discovery using CDP.
Step 1: Using the sh cdp command fill in the table below
| How often are CDP advertisements being sent | |
| How long will a CDP neighbour entry be held in the table without being refreshed | |
| What version of CDP is currently running on your device |
Step 2: Issue the sh cdp nei command and if you see any devices fill in the table below.
| Device ID | Local Intrfce | Holdtme | Capability | Platform | Port ID |
|---|---|---|---|---|---|
Step 3: Execute the sh cdp nei detail command, do you see any additional information not
shown using the command in step 2.
Lab Answer Keys:
[sociallocker id=”4139″]
Task 1: Router hardware and software inspection.
Step 2: Use the appropriate command to display the hardware and software properties of the router.
R#sh ver
Fill in the table below.
Step 3: Check the NVRAM for a startup-config file using the sh start command and remove
the startup-configuration if one exists using the erase startup-config command.
R#sh start
R#erase startup-config
Step 4: Issue the reload command to restart the router and observe the boot process from the console.
R#reload
confirm
Task 2: Create the initial Router configuration.
Step 1: Skip the initial configuration dialog, terminate the autoinstall and enter privilege EXEC mode.
Router>enable
Router#
Step 2: Set the system hostname to either R1 or R2
Router#conf t
Router(config)#host R1
or
Router(config)#host R2
Does the system prompt change?
YES
R1(config)#
or
R2(config)#
Step 3: Enter the correct configuration mode to add a description to the first ethernet interface on the router (fa0/0 or gi0/0) Link to LAN Switch.
R(config)#int fa0/0
or
R(config)#int gi0/0
R(config-if)description Link to LAN Switch
Step 4: Configure an interface IP address and mask with reflects the values shown in the Visual Topology diagram.
R1 10.1.1.1/24
R2 10.1.1.2/24
R1 only.....
R1#conf t
R1(config)#int fa0/0 or R1(config)#int gi0/0
R1(config-if)#ip address 10.1.1.1 255.255.255.0
R2 only.....
R2#conf t
R2(config)#int fa0/0 or R2(config)#int gi0/0
R2(config-if)#ip address 10.1.1.2 255.255.255.0
What is the status of the interface?
administrative down
Use one of the following commands to determine the status.
R#sh ip int brief
or
R#sh int fa0/0
or
R#sh int gi0/0
The majority of Layer 3 interfaces are shut down by default, whereas layer 2 switch ports are enabled by default.
Do you think we could ping the IP address of the switch?
NO
Take any necessary steps to enable IP connectivity between the Router and the Switch before you move on to the next step.
R(config-if)#no shut
Step 5: Save your running-config to NVRAM
R#copy run start
Task 3: Changing default CLI parameters.
Step 1: Change the EXEC timeout on the console port to a value of 60 minutes
R#conf t
R(config)#line con 0
R(config-line)# (you are now in the console line configuration mode)
R(config-line)#exec-timeout 60
Step 2: Enter the sh line con 0 command
Does this command verify the new timeout value?
Yes idle exec 01:00:00
Step 3: Improve the readability of the console access by synchronising unsolicited messages and debug outputs with the input of the CLI.
R(config-line)#logging synchronous
Step 4: Use the relevant command which prevents the system from translating a mistyped command to an IP address.
R(config)#no ip domain-lookup
Step 5: Save your running-config to NVRAM
R#copy run start
Task 4: Neighbour discovery using CDP.
Step 1: Using the sh cdp command fill in the table below
| How often are CDP advertisements being sent | 60 seconds |
| How long will a CDP neighbour entry be held in the table without being refreshed. | 180 seconds |
| What version of CDP is currently running on your device | CDP v2 |
Step 3: Execute the sh cdp nei detail command, do you see any additional information not
shown using the command in step 2.
The detail option can be used to display layer 3 information such as an IP address.
[/sociallocker]