
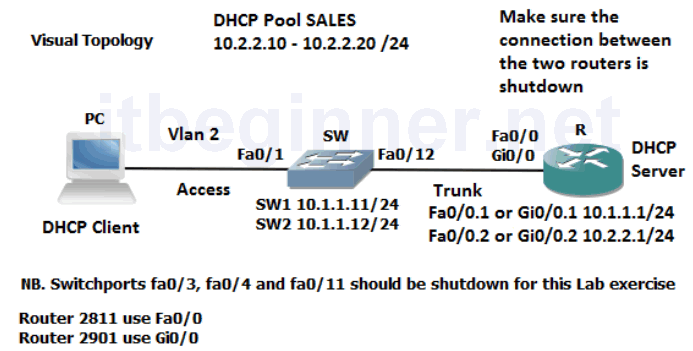
Visual Topology
Command Line
| Command | Description |
|---|---|
| default-router address | |
| dns-server address | |
| ip dhcp excluded-address ip address [last ip address] | |
| ip dhcp pool name | |
| ip helper-address address | |
| lease {days[hours][minutes] | infinite} |
Physical Topology Diagram
- Task 1: Setting-up DHCP address Pools
- Task 2: Excluding static IP addresses from a DHCP Pool.
- Task 3: Testing the DHCP Service
Lab 4-2: Using a Router to provide DHCP Services
Task 1: Setting-up DHCP address Pools
Step 1: Access the CLI of the router
Step 2: Configure a DHCP pool named SALES
Rx(config)#ip dhcp pool SALES
Step 3: Adding the IP network/subnet to the DHCP pool
Rx(dhcp-config)#network 10.2.2.0 255.255.255.0
Step 4: Adding the default gateway and dns server options to the DHCP pool
Rx(dhcp-config)#default-router 10.2.2.1
Rx(dhcp-config)#dns-server 8.8.8.8
Rx(dhcp-config)#exit
Task 2: Excluding static IP addresses from a DHCP Pool.
Step 1: Limiting the scope of the DHCP pool
Rx(config)#ip dhcp excluded-address 10.2.2.1 10.2.2.9
Rx(config)#ip dhcp excluded-address 10.2.2.21 10.2.2.254
Task 3: Testing the DHCP Service.
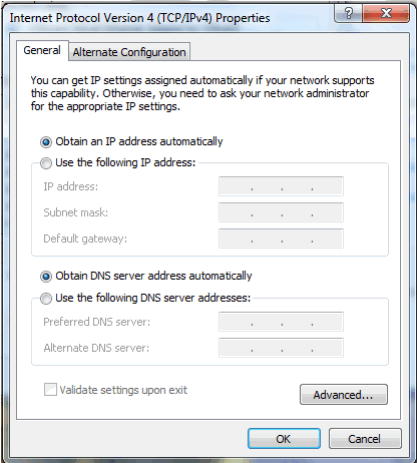
Step 1: Reconfigure the network properties on the PC to request an IP address from a DHCP server.
Step 2: From the PC command prompt verify your IP address.
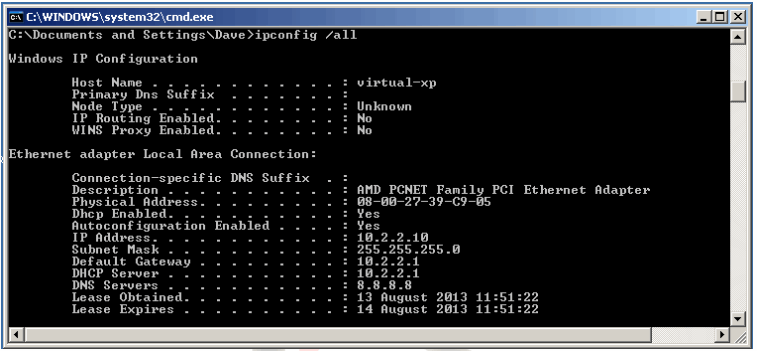
Remember this is an example output.
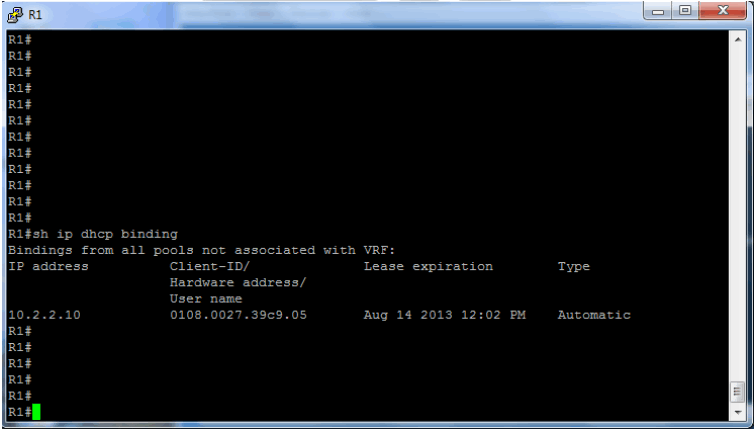
Step 3: Access the CLI on the router and execute the following command to display current IP address allocation.
Rx#show ip dhcp binding
Lab Answer Keys:
[sociallocker id=”4139″]
Task 1: Setting-up DHCP address Pools
Step 2: Configure a DHCP pool named SALES
R>en
R#conf t
R(config)#ip dhcp pool SALES
Step 3: Adding the IP network/subnet to the DHCP pool
R(dhcp-config)#network 10.2.2.0 255.255.255.0
Step 4: Adding the default gateway and dns server options to the DHCP pool
R(dhcp-config)#default-router 10.2.2.1
R(dhcp-config)#dns-server 8.8.8.8
R(dhcp-config)#exit
Task 2: Excluding static IP addresses from a DHCP Pool.
Step 1: Limiting the scope of the DHCP pool
R(config)#ip dhcp excluded-address 10.2.2.1 10.2.2.9
R(config)#ip dhcp excluded-address 10.2.2.21 10.2.2.254
Task 3: Testing the DHCP Service.
Step 2: From the PC command prompt verify your IP address.
IPconfig /all
Step 3: Access the CLI on the router and execute the following command to display current IP address allocation.
R(config)#exit
R#show ip dhcp binding
[/sociallocker]