
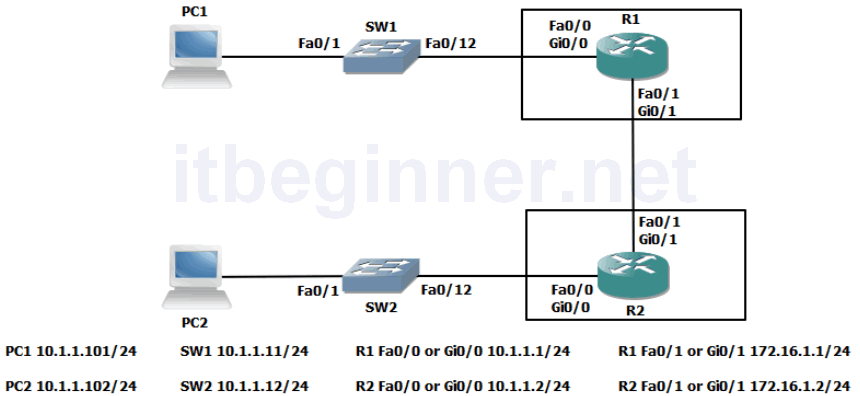
Visual Topology
Command Line
| Command | Description |
|---|---|
| Interface loopback0 | Creates an internal interface |
| ip access-group acl name [in/out] | Binds an access control list to an interface |
| ip access-list extended acl name | Creates and enters the ACL configuration mode |
| {permit | deny} {test conditions} | Creates control statements within an ACL |
| show access-lists acl name | Displays any ACL located on the device |
| show ip interface type/slot/number | Displays any ACL bound to an interface |
Task 1: Configuring an ACL (Access Control List).
Step 1: Access the CLI on your router
Step 2: Create a loopback interface using the following commands.
R1 only...
R1(config)#interface loopback0
R1(config-if)#ip address 1.1.1.1 255.255.255.255
R1(config-if)#no shut
Note we are using a 32 bit mask.
R2 only...
R2(config)#interface loopback0
R2(config-if)#ip address 2.2.2.2 255.255.255.255
R2(config-if)#no shut
Step 3: From your PC check that you can ping the IP address of the loopback interface you have just created and also your default gateway.
If two network cards are fitted you will need to type in the following commands.
PC1 only....
c:\>router -p add 1.1.1.1 mask 255.255.255.255 10.1.1.1
PC2 only.....
c:\>router -p add 2.2.2.2 mask 255.255.255.255 10.1.1.2
If the ping fails check the following.
Does your PC have the correct IP address ? hint… ipconfig
Can you ping your default gateway ? If not check that the router interface is up/up
Step 4: Create an extended ACL named PING that will prevent your PC from successfully pinging the default gateway, however you should be allowed to ping the loopback interface and all other IP traffic should be permitted through the router.
Step 5: Test your ACL and use the appropriate show commands to display the content of the configured ACL and write down your results below.
Rx#show access-list PING
Are access-list names case sensitive ?
Step 6: Once you have proved that the ACL works correctly then remove it from your configuration.
Step 7: Save your configuration
Lab Answer Keys:
[sociallocker id=”4139″]
Task 1: Configuring an ACL (Access Control List).
Step 2: Create a loopback interface using the following commands.
R1 only...
R1>en
R1#conf t
R1(config)#interface loopback0
R1(config-if)#ip address 1.1.1.1 255.255.255.255
R1(config-if)#no shut
Note we are using a 32 bit mask.
R2 only...
R2>en
R2#conf t
R2(config)#interface loopback0
R2(config-if)#ip address 2.2.2.2 255.255.255.255
R2(config-if)#no shut
Step 3: From your PC check that you can ping the IP address of the loopback interface you have just created and also your default gateway. This should work!
If the ping fails check the following.
Does your PC have the correct IP address ? hint… ipconfig
Can you ping your default gateway ? If not check that the router interface is up/up
Step 4: Create an extended ACL named PING that will prevent your PC from successfully pinging the default gateway, however you should be allowed to ping the loopback interface and all other IP traffic should be permitted through the router.
R1 only....
R1#conf t
R1(config)#ip access-list extended PING
R1(config-ext-nacl)#deny icmp 10.1.1.101 0.0.0.0 10.1.1.1 0.0.0.0 echo
R1(config-ext-nacl)#permit ip any any
R1(config-ext-nacl)#int fa0/0
or
R1(config-ext-nacl)#int gi0/0
R1(config-if)ip access-group PING in
R2 only....
R2#conf t
R2(config)#ip access-list extended PING
R2(config-ext-nacl)#deny icmp 10.1.1.102 0.0.0.0 10.1.1.2 0.0.0.0 echo
R2(config-ext-nacl)#permit ip any any
R2(config-ext-nacl)#int fa0/0
or
R2(config-ext-nacl)#int gi0/0
R2(config-if)ip access-group PING in
Step 5: Test your ACL and use the appropriate show commands to display the content of the configured ACL and write down your results below.
Rx#show access-list PING
Are access-list names case sensitive ?
YES
Step 6: Once you have proved that the ACL works correctly then remove it from your configuration.
R(config-if)#no ip access-group PING in
R(config-if)#exit
R(config)#no ip access-list ext PING
Step 7: Save your configuration
R(config)#exit
R#copy run start
[/sociallocker]